RSS

Another dose of ‘before and after’ styles from Dekko Salon. Our clients are so great for letting me take photos to show different looks for my blog – Thanks again for all your help.
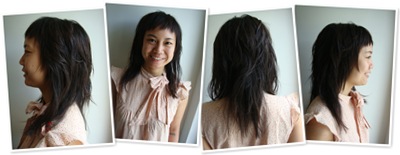
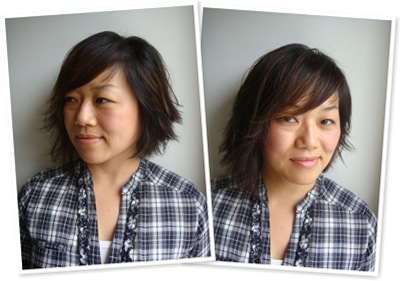
I’ve been cutting Kim’s hair for over 10years now and she has always been very creative with her haircuts over the years, just recently we have been keeping Kim’s hair on the longer side. So this is Kim after not having a haircut for over 5 or 6 months. That’s because she’s abit of a gypsy and has lived all over the States, right now she comes all the way from Chicago : )

We decided to keep the hair on the longer side but ‘chop’ all the rest of it up with shorter layers and a shorter front area, so that if she decides to tie her hair up, it still looks like a cute short haircut on top. We razored the hair throughout as Kim’s hair is very thick and coarse. We then styled it using a styling cream for hold and dried it while twisting the hair into big sections, creating a messy textured look. Thanks Kim!

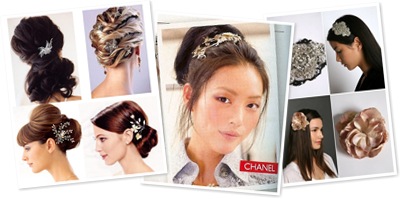
Hair Accessories and Ornaments are so popular and there is so much choice nowadays so I decided to write about them and show you as much variation as I could…
In Ancient times, hair accessories have always been very important, they are works of art but not only are they decorative and lavish, they also reflect personality and characteristics of the traditional culture, as well as using them as good luck pieces. The more lavish the piece,the higher the status of the wearer.

In this day and age, we don't have to even worry or think about status and messages sent when we decide to wear a hair ornament, Thank goodness! We can just wear them, have fun and look great. Now lets start with the most simple of accessories:

Clips – these are easy to use, simple or very ornate and can be pinned wherever it may make the hair look more attractive….


Headbands – Again very easy to put on, can be cutesy looking but great for keeping hair back off the face. Careful you don't end up looking too preppy tho, if that's not the look you want! I love this giant poppy on the right : )
Flowers – Great for weddings especially but can also look very charming for other occasions too. Can be varied so much not only in size but from real flowers to silk or other fabric types, and also flowers can work well or shorter hair too:

Funky Alternatives – Definitely for those who want to make more of a statement and stand out more as fun and funky, seen below is designs by Chloe Lau (1) and Twinkie Chan (2) Thanks girls for letting me showcase:


Feathers – I think this one is one of my faves, I LOVE feathers in every way, so these accessories are right up my alley, not only are they funky and make a statement like those above but I would say these are a little more extravagant in the looks.Thanks to Laura Kranitz who designed (pics 1 & 3 ), and also to Vintage Joy Designs (Pic 2, Photography by Vivian Chen )


So its time to go out and get yourself some accessories to have some fun!

Well, I have to take advantage of this and blow my own trumpet by sharing with you a couple of articles that were written about me and Dekko Salon recently. The articles were written by Sonja Shin Hodgkins who not only writes her own beauty blog which includes making beauty ‘how to’ videos, but she also writes for the Examiner Beauty and Wellness section.

So here’s a link to both of them:
From The Examiner
Sonja's Beauty Blog - Hello Beauty


Enjoy them! Thank You so much to Sonja for writing such a fabulous article, I couldnt have asked for more!!

I would like to say Thanks to Twinkie Chan for her awesome write up on my new product, what a great idea she came up with and what fantastic and loyal support xx


Check out what she has to say:


Technorati Tags: ,

OK, so here’s my pick of the day…
My Pick 8bI love this although we all know its a catwalk/stage look, I mean if I went on Bart or Muni with my hair like this I’m sure I’d be getting quite a few stares as well as a few larfs, but nevertheless, I still love it for its shape and volume, and of course, you know me with my love of big curly (yes, even frizzy hair).
The hair was done by Keith Carpenter for an issue of the Marie Claire Magazine. Thanks Keith for your creativity.
This look can be achieved either by combing/picking out naturally curly hair to achieve the height and width, or the hair can be set first either on very small rollers or pipe cleaners, and then picked out or combed out for the required look.

PhytoVolume Actif:

IMG_0526
This product used to be one of my all time favourites for fine limp hair! It even wond the Allure’s editors choice award. I’m not even sure whether its still sold in California anymore as I remember some new FDA law coming in and Phytologie had to re-formulate it for California. Unfortunatley once re-formulated, of course it just didnt work as well : (
So for you people who are outside of CA who can still get hold of the original formula, I highly recommend it if your hair is fine, flyaway and flat. This stuff has great hold but not so much that it becomes sticky and tacky during your drying process, which is one of the main problems when drying fine hair with product on it.


(Apologies for the sudden bombardment of Superpoke ads, frustrating I know, just x them out)

HAPPY 4TH of July !!
Enjoy another round of Cool Mops around town. Thanks to all the girls who posed for me - Kerina, Helen, Joanna and Michelle. You all look great.
If you see any cool mops around, please feel free to send me some pictures and we can post them to showcase the styles!!
jules@juleschan.com

Sometimes for me, I fall in love with just the ‘look’ of a hairstyle, it doesn't necessarily have to be a precise haircut or anything too defined. One of my favorite things, especially on myself is ‘messy’ unstructured undo's. I know this picture is abit hazy but I hope it will show you an idea of what I mean…


My Pick 10
See how the texture is so messy, like she's been out blowing in the wind all day, and then one side is just dragged up to create a different shape! Great Look!
If your lucky enough to have texture in your hair then this look will happen naturally and easily but if not, time is spent just to get this very natural undone hairdo!
I will continue to hunt down more messy up do's to show you.

QUESTION - by Helen:

How on earth can I get some lift in my roots without having to dry it upside down? I have tried doing that and it just foes abit too wild and messy. Help?


ANSWER - by JuJu

Yes, drying your hair upside down will definitely cause the hair to become messy and also tangled, and if this isn't the look your going for, the best way to get root lift is by lifting sections of your hair and using the hair dryer to blow underneath each section, drag and dry the roots going the opposite way to the way it normally lays, then do the same with the other side as well as with the back, where you would drag the hair up and forward. If you continue to do this method of lifting until the hair is almost dry, you wont need to use the brush to get root lift either, which can be abit messy too as the hair can tangle easy at the roots. Hope this helps.


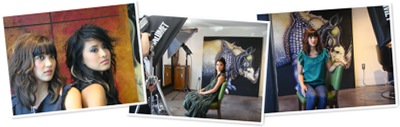
The other day we did a photo shoot for my new JuJu Chan Hair Product. I wanted the girls to reflect a certain style that I had in mind to represent my product line and of course, for their hair to represent my very first styling product – ‘TEXTURE’ Powder Styler.

We were very lucky to have our Photographer Claudia Ward, Make Up artist Brande, our young helper Gabe and of course our 2 fabulous models Livia and Kerina who all did FANTASTIC work!


And I must also thank Joni for doing the haircut on Livia for me and also Jodi for her lovely wardrobe.

I hope you enjoy these background photos from the fun day we had, it was shot on location at Dekko Salon, and I’ll soon post the actual finished photos that I will be using to present this product.

I was very happy with the result, both girls were styled with my Texture Powder Styler to get their looks. I knew I didn't want the pictures to look like hair advertisements so I made sure they looked more like fashion shots rather than being ‘in your face’ hair shots, the end result was very sophisticated and hip, yet not too trendy : )

Stay posted for the final results of the shoot. Thanks to everyone for their creative help and vision.

Every now and again we at Dekko are lucky enough to get some outside teachers sent our way to give us inspiration and show us some new techniques.
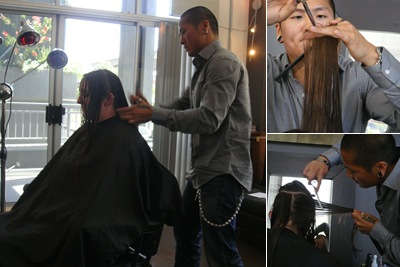
Jin Bang, Artistic Educator from Prive Salon (LA & NY) came over to give us a demo on 2 models. The stylists had requested he show us a long layered haircut (always useful on our clients) on one model and the other model, a creative look.

Here’s Jin working on Kayleigh with his creative techniques. He showed a variation of how to remove bulk from the hair and adding lots of texture to it.
Before and after pictures of Sharon, His long layered haircut (the Kim K. as Jin would call it)(as in Kim Kardashian)! Starting with the base line to get the desired length, then he went to the front area and carved out a ‘C’ curve into the side areas. Lastly, the layers were picked straight up from the head and angled from short to long then blowdried using a round brush to create the body.
And here is before and after pictures of Kayleigh again, Jin’s creative haircut as seen in the above pictures. Jin started working from the inside out, starting with the internal layers and taking lots of bulk out with his new techniques before cutting the length off (using a back-cutting technique). He then went into the front area and sliced the front off, then returning to the sides, he connected the back length to the sides, keeping the sides longer. he continued to remove bulk throughout the layers through the top area too. Once the blow dry was completed, Jin returned into the whole haircut and refined any unwanted long areas of hair.

Both models looked great and we were very inspired by Jin, Thank You so much for ‘popping’ over and showing us a thing or two!

I wanted to talk a little about Dry Shampoos, not only because there is an influx of new products out there in the stores but also because I am about to launch my very own! Yippee, I’ve been working on it for over a year!!

Anyway, Dry Shampoos used to be known as the stuff your mum would buy to make her hairstyle last abit longer, with very white powdery sprays that not only is left on the head for all to see but the smell of it used to practically gas you out when sprayed!!

But now, they have been re-vamped and have a brand new reputation as one of the ‘must haves’ in hair products. The new products not only absorb oils but also give the hair alot more body and thickness. Ideal for use on fine thin greasy hair. It leaves the hair with a rougher feel so the hair is more malleable.
They come in powder or spray form. The sprays are easier to use on full heads of hair whereas the powder ones are used to concentrate on particular areas. Both should do the same thing, although personally I find the sprays a little bit more sticky in feel.

Reasons for use:

Greasy flat fringes – the powder will absorb the excess oils in the fringe and parting area to give it an edgier rougher look instead of the shiny flat look. Best to apply the powder onto your fingers or lightly sprinkle onto the roots and rub it into the the hair, don't forget the very front where it falls onto your skin. (This is usually the worst part)

Updos – The Dry Shampoo is fantastic for use on ‘updos’ When the hair is too clean and shiny the hair doesn't hold very well so with the more powdery texture that the dry shampoo gives, the style will hold better and look more matte and less lacquered looking.

To add more body and oomph – sprinkle/spray dry shampoo all over the roots to give yourself fuller bigger hair. Brush or fluff it out after 5mins when the oils have absorbed.

Try not to overdo the application as the result can be too white or too chalky but if you do happen to overdo it, spritz it with a light misting of water to get rid of the white look.


I am extremely excited to announce the launch of my own dry shampoo, JuJu Chan’s ‘Texture’ in both light and dark shades to cover every hair type and color. I love it and use it every day and hopefully you will too! Keep an eye on this blog and find it on my SHOP page very soon!


As Featured On EzineArticles

Throughout my career I have come across many cases of Alopecia (bald patches) in varying degrees of severity. My job is to work around the hair and give a haircut that can cover the areas as best as I can (if the cases are not TOO severe) Because this condition can affect both sexes (although most common in late teenage years, early childhood, young adulthood) it can happen with people of all ages so I wanted to write about the basics of Alopecia so people can understand and be made aware of it. We as hairstylists mostly come across Numbers 2 and 3 types (see below).

ALOPECIA AREATA
What is it?
It is a condition in which hair is lost from some or all areas of the body, usually the scalp. It can cause anywhere from one or two bald patches (which is most common) to can spread to the entire scalp and epidermis. Alopecia is NOT contagious. What types are there?
1. Diffuse Alopecia Areata - Hair lost more diffusely over the whole scalp
2. Alopecia Areata Monolocuris - One spot of baldness
3. Alopecia Areata Multilocularis - mutiple areas of hair loss
4. Alopecia Areata Totalis - Loss of all hair on the scalp
5. Alopecia Areata Universalis - Loss of all body hair
6. Alopecia Areata Barbae - limited only to the beard


What does it look like?
Here are show some different stages of Alopecia as mentioned above:

What causes it?
Some of the strong suggestions lead us to believe that the factors that cause it are:
Hereditary – Families with 1 or 2 affected family members or members with Autoimmune Disorder (in which the body attacks is own hair follicles) Emotional Stress, or an infectious agent/germ can trigger off the condition.


What can be done about it?
With cases where there are small patches involved, Steroid Injections are used in the sites. Other medications (ointments and topical cream) can also be used in different combinations. In 90% of cases, the hair will ultimately grow back. In more severe cases of hair loss, there has been limited success treating Alopecia, and in the case of Alopecia Totalis, adapting to the disease rather than trying to treat and cure it, is probably the best way to go. For example, wearing your baldhead as is, or wearing wigs. Remember that Bald is Beautiful as shown below:

baldisbeautiful

I would like to thank Randy Sid for checking my facts and making sure I'm on the right road on this.

Technorati Tags: ,,

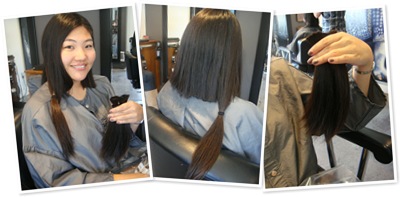
I wanted to feature some work from one of our other stylists from Dekko Salon. Joni Shibata Philips has been with the company since it started and here she is with Cathy, about to do quite a drastic change.


Cathy came in with long thick hair and wanted to donate her hair to Pantene's Beautiful Lengths, I wrote an earlier post on Donating Hair and if you want to re-cap follow this link:
http://www.jujuchan.com/2009/03/hair-donations.html


Most companies are quite strict and need at least 10 inches before they will accept the hair, but at least this one does accept colored hair, whereas some of the other companies needs the hair to be in its ‘virgin’ state. Cathy being the ideal candidate anyway, came in to see Joni and I couldn't resist documenting the change for you.


Here’s Cathy during the ponytail cutting section:

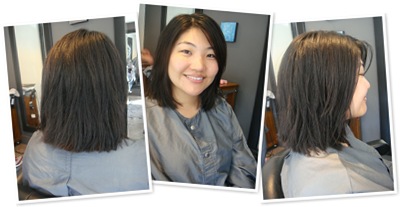
Joni cut the hair just below the shoulder and because the hair is so heavy and thick, she proceeded to layer it through and took LOTS of weight out of it to ensure that the hair is able to move and that it will be easy to keep. The hair was then blow-dried and a pomade was rubbed into the ends to give it a chunkier finish to the layers. Here’s Cathy looking very fresh with her newly shorn locks.
Thanks Cathy for posing for the photos : )

bedhead


Well… to be honest with you, I’m not sure whether this woman is showing off a very creative updo, or whether she’s carrying her wool/yarn around on top of her head? Whatever it may be, its a very creative look and I’m sure it might have inspired this shoot below from America’s Next Top Model Photo Shoots!! (Shot at the Great Wall of China).


America's Next Top Model

OK, so whats the difference between the Japanese Straight Perm and the Brazilian Straightener ?(Note: not to be confused with the Brazilian Blowouts) Alot of people have been wondering, so here are the most basic points for consideration…

  • Japanese is permanent and will grow out, Brazilian last about 3-4 months and reverts back slowly.
  • Japanese result is poker-straight and flat, Brazilian’s can keep waves and body in the hair.
  • Japanese gets the best results done on healthier hair and is not advisable for light blonde hair, Brazilian can be done on damaged porous hair, even ultra light blondes.
  • Japanese is more expensive because it usually takes longer, between 4 and 6 hours, whereas the Brazilian can be done in 2 to 3hours.
  • You will see a re-growth with the Japanese because the structure will have been changed, whereas the Brazilian will slowly revert back to its normal texture and there is no permanent change.
  • Japanese will allow any type of shampoo to be used with it once done, although a special conditioner is recommended, the Brazilian needs sulphate free shampoos to make the treatment last longer, any salt (ocean water) will reduce the life of the treatment.
  • When freshly done, both the Japanese and the Brazilian advises you not to tie your hair up or tuck it behind your ears for 48 hours.


This style is SO cute..it had to be my pick of the week!


My Pick 9
This hairstyle goes to show us all that even with a simple, slightly layered bob, all you need to do is add a bluntish choppy fringe, add some products, twist it up and dry it with a lot of texture and the result can turn out super cute!


You all know by now that I have a thing about curly hair, especially tight curls but here are some examples to show Asian Afro hair that some of you may or may not like so much (matter of opinion, I guess)


Asian-Afro_060209_m

(Personally I like the girls above, she looks very hip and suits her face shape and of course age, cant say I feel the same about the boy tho’)


But now here’s someone who ALWAYS looks good with her Asian Afro (this might have something to do with the fact that's she’s a goddess no matter what) MAGGIE CHEUNG MAN YUK
Maggie has mostly had afro textured hair whenever I see her with shorter hair, and I personally have had the honor of styling it and making it look as silky and normal as I could for a commercial (not the easiest of styling jobs, I must add)( I will show you in a separate post about my job) but she somehow manages to make Asian Afros look cool, hip and extremely beautiful regardless of age! Here she is in a scene from her movie ‘Clean’.


Maggie_Cheung_Clean_0019

Continuing from my post about face shapes I wanted to talk a little more about suitability in facial features and body shapes – 2 other important considerations to take into account when deciding on hairstyles.


Strong Facial Features:
Below are just a few ‘more extreme’ samples of how important features are when choosing hairstyles, the more experience the stylist is the more they can automatically access facial features as soon as they see the client.
(just in case you cant see the text very well, here they are again.)
  • Long fringes can accentuate a bigger nose.
  • A ‘Nefertiti’ style would accentuate a long chin.
  • A short style, particularly around the ears, will bring them out more.
  • A style with horizontal lines will not do justice for someone with a wide neck or double chins.
  • A short fringe will accentuate a protruding forehead.
  • A flat face is made flatter if the style is worked straight up from the hairline.
suitability


Height and Body Shapes:
These also make a difference to your choice of hairstyles. It is important for the stylist to see the client before she sits down so that you can take note of her body proportion.
If a tall, thin person had a hairstyle which is very short and close to the head, or very long hair that is straight and flat, then the body length will be accentuated more, whereas if the style had more width, the stream-line would be broken giving an overall better body proportion.


body shapes 1
On the other hand, if a person is small but in proportion, then anything that is not TOO wide would be suitable, but if the person was small, and wide in shape, then the situation would be different. To add a hairstyle with width would be adding width to the overall look, but if the style was very short and flat, this would also accentuate the roundness of the body. It is not always easy to reach a happy medium, especially if the client has a certain style in mind. The stylists job is to suggest styles which complement her all round. If the correct approach is used, most clients are willing to accept your ideas and styles, as long as you have a reason to back up your suggestions.


body shapes 2
Again, I am using extreme examples to show my points easier, it does not mean that all persons belong in any one category of body shape or that you cannot go against type but in general, we must remember to evaluate the body along with the face shape and features when choosing styles.


Found this patented new apparatus online…..


6526663-0-display


Well… Not sure what to think of this one. Four guys have come up with the idea of designing a detachable comb/shears apparatus, so instead of using 2 hands to do your scissor over comb technique, you can go ahead and just use the one hand!!!!
Sure hope they get this one made, I would love to try it for those full on barbering days and especially when I’m feeling lazy!!

I wanted to write this post for you because I know alot of woman become frantic when/if they start to lose their hair after they have had their babies.

I wrote a post earlier about Hair during Pregnancies, and if you want a re-cap follow this link:
http://www.jujuchan.com/2009/06/pregnancy-hair.html


Anyway, this one is to show how your hair will (90% of the time) grow back to normal thickness and healthiness. Here is Mina again 10months later when all hormones have settled down, with her hair looking thick and healthy again.


Before: (recap)

DSC05857

And here is Mina after: (looking all cute)
We cut Minas hair into an asymmetric bob shape, giving her lots of layers for body and fun, we didn't use any razoring techniques as we wanted to make sure the hair didn't end up looking too thin, so we used scissors to texturize the ends.

Thanks Mina.

I know, there are so many straighteners, straight perms, relaxers etc on the market I want to make sure I cover them all.. I will write a future post on the differences between this Japanese Straight Perm and the Brazilian Straightener but for now I enlisted the help of Jodi Ninomiya, one of Dekko’s top- notch technician to help explain the technical side of what its all about…..


Japanese hair straightening, also known as thermal reconditioning, is a method of permanently straightening hair. The iSTRAIGHT system which we use at Dekko, utilizes 3 strengths of solutions to meet the needs of each individual’s hair texture and condition. The hair is treated with a soy based relaxer which is rinsed out after a 10-25 minute processing period. The hair is then blown dry, flat ironed, and neutralized for 5-10 minutes. The iSTRAIGHT formulas use negative ions to relax and positive ions to neutralize and, at the same time, keep hair healthy and vibrant. Ingredients include Ceramide, a natural resource, that is part of you intercellular bonds which aids preventing cuticle damage and keeps the hair healthy from the inside out.


Thanks Jodi…..
Here are some samples of the Japanese Straight Perm:


So, who would benefit from this?
People with coarse frizzy hair, People who spend alot of time blow drying their hair and finishing with a flat iron, People who love their hair very straight and flat,
How long does it take:
This process depending on how long and thick the hair is can take anywhere from 4 to 6hours, so be prepared for alot of sitting around.
How long does it last?
Once the hair has been straightened in this way, it stays straight for good, the hair will not go back to its original state, therefore the re-touch is only necessary or the roots. so if your is hair is not too curly/way, the re-growth is not so obvious and you could go up to a yea without redoing it, but it your hair is very curly and stands out when it grows out then it is advisable to have it done between 5 – 6 months also depending on how fast your hair grows.


Here is a photo showing the re-growth from the Japanese Straight Perm..


DSC00741